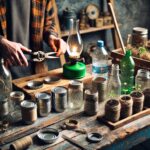
How You Can Start A Fire From A Portable Cell Phone Power Bank

How You Can Start A Fire From A Portable Cell Phone Power Bank

How You Can Start A Fire From A Portable Cell Phone Power Bank

We have all seen videos around the internet on starting a fire with steel wool and a cell phone battery. That is  a great way to start a fire in an emergency. The issue is that many phones now have sealed batteries. So I wondered Can Start A Fire From A Portable Cell Phone Power Bank? With phones dying so fast many people carry these portable charging devices. 


Read More

How To Build A DIY Ballistics Plate Body Armor

How To Build A DIY Ballistics Plate Body Armor For Cheap

How To Build A DIY Ballistics Plate Body Armor


How To Build A DIY Ballistics Plate Body Armor

Today I have not one but two youtube videos for you. You get a DIY build video on How To Build A DIY Ballistics Plate Body Armor and then the test shooting of that DIY ballistics plate. 

I really want a real body armor plate. I also want to shoot the hell out of one. There in lies my problem. If I had a ballistics plate, like the great guys at AR500 (hint hint) I would want it for a SHTF scenario. But I also want to try to destroy one as well. 


DIY 2 Survive!

My solution is to build and show you How To Build A DIY Ballistics Plate Body Armor. Will it be as good as a professionally made one? Nope. Will it stop a bullet? Hell yes, it will! I don’t recommend you building one of these and going out to fight ISIS. In a SHTF I would wear one of my DIY ballistic plates over wearing nothing. 

The cost for this was around $30. I used a steel I-beam piece, a ceramic floor tile, duck tape and a can of plastidip. This thing is heavy as shit.  And tough as a hell. 

Read More

How To Build An Off Grid Gravity Fed Water System Cheaply

How To Build An Off Grid Gravity Fed Water System Cheaply


How To Build An Off Grid Gravity Fed Water System Cheaply


How To Build An Off Grid Gravity Fed Water System Cheaply


An off grid Gravity Fed Water System is a great  option for  running water. Since many of us off grid dwellers and tiny house owners do not have running water.  Yes, you can live without running water. Indoor plumbing has been around a long time but mostly for the wealthy. Your average 16th century English Farmer would have to carry in water. The same still holds true for many parts of the world today.

The system I’m going to show you how to build is not a whole house solution. The principles will scale up, though. This is a cheap and easy solution to get a gravity fed water system for a sink. So this is perfect for doing a few loads of dishes, brushing teeth or hand washing.

Best of all this build is both easy and cheap. I built the system in just a few minutes. I spent the next few days tinkering with it to try to optimize it.


Off Grid Gravity Fed Water System
The Parts

Parts

  • Five Gallon Bucket With Lid
  • Tubbing
  • Threaded PEX connector
  • Threaded PVC Piece
  • Rubber Washer
  • Hose Clamps That Fit The PEX Connector.
  • Faucet Connector
  • PEX Faucet Shut Off

Some of the parts listed are not specific. Therefore they will vary based on your needs and availability. You can do like I did and stand in the plumbing section of Lowe’s for an hour trying pieces for a fit. Unless you are going to be reducing it’s best to get tubing the same size as your PEX connectors. I believe the tubing I used was 3/8th. That was a very snug fit on the faucet shut-off connector.

You could also just go into the local hardware store and ask for help. If you get a smart employee, yes it happens sometimes, you can be out quickly. Just tell them you’re looking to hook up a hose to a five-gallon bucket.


Gravity Fed Water System
Drilling the hole

Building The Bucket

Use a paddle bit to drill a hole the size of your threaded piece. In my case, this was 3/8th size hole. Be careful not to let the bit dance. If you do the hole will be bigger than the connector. Also, Plumbers tape will help to a degree.

I had to get a pvc piece that was female on one side and male on the other.  Put Teflon tape on the PEX piece and screw into the female side. Use Teflon tape on the male side. Put a rubber washer on.

For inside the bucket, I had a female threaded open piece.

Thread the male connector into the bucket. It should be a tight fit. You want the piece to go all the way into the bucket for the washer to prevent leaks.

On the inside of the bucket, I put another rubber washer on threaded side. That way there is a washer on the inside and outside of the bucket to prevent leaks.

Thread the open female piece on the inside of the bucket. Tighten it as snuggly as you can by hand. Using a wrench would break something for sure.

Preparing The Line

At this point, it’s best to place the bucket where you are going to want it. Take the tubing you have and place on one of your hose clamps. Work the tubing onto the PEX barbed end on the bucket. It will be a really tight fit. This is what we want. When the tubing is all the way on, move the hose clamp to the center of the barb. Tighten the hose clamp. Don’t go crazy tightening it down, you don’t want to crack the PEX barb.

Run the tubing to the sink. It will most likely be too long. I didn’t want to have excess tubing congesting my Gravity Fed Water System. The less distance it travels will help with the pressure. Cut it to be just enough to reach the sink.

Nest put a hose clamp on the tubing and attach to the shut-off valve. And the Shut off piece connects to the faucet connector and that screws onto the sink.

Gravity Fed Water System

Set Up

At this point, everything should be hooked up for your Gravity Fed Water System. Since this is only going to feed the cold water tap on the faucet. Don’t forget to either plug or shut off the hot water side. I used a faucet connector and shut off valve on it. Therefore the water  will just pour out. Ask me how I know.

Now fill the bucket with water. Check for leaks. Also you could use silicone to seal the connector coming out of the bucket. I have not had it leak in weeks of use, though.

Then turn on you shut off valve to the faucet. Check for leaks. If no leaks turn on the faucet. Remember only the cold will work. If water comes out awesome you did it! In the event that the water won’t flow it has air in the line. So we have to get the air out of the line first.

Also you could install a check valve to get the air out. I just squeezed the tubing near the bucket. When you squeeze the tubing it forces the air inside the bucket and fills the line with water. Once the line is completely filled with water it will flow.


Off Grid Running Water Gravity Fed Water System
Off Grid Running Water

Conclusion

In conclusion, I have been without running water for almost 2 years, living in  my tiny house. It isn’t that bad honestly. In particular many things you take for granted are made difficult. Like doing the dishes. So you can’t just rinse off something. The first thing I did after building my Gravity Fed Water System was to do some dishes. Finally It felt great to have running water to do dished with.

I fiddled around trying to get the water pressure to be better with no luck. Also don’t expect any great water pressure. It will flow steadily. But it will flow.

This project cost less than $30 and took less than an hour. As a result,  I can turn a faucet and water comes out. For a short term disaster or for those that live off the grid this is a cheap and easy solution.  So the next step  from this system  is rain catchment and a water pump. You could possibly do that for $100. Probably not, though. As an interim to that, this Gravity Fed Water System fills the gap perfectly.

What do you do for water? Have you built a Gravity Fed Water System? Let me know in the comments!


Want to hear yourself on the podcast? Call in with your questions at (615) 657-9104 and leave us a voice mail. 

Like this post? Consider signing up for my email list here > Subscribe

Think this post was worth 20 cents? Consider joining The Survivalpunk Army and get access to exclusive

 content and discounts!

DIY 2 Survive

DIY 2 Survive A How To Guide Of Great Prepper Projects


DIY 2 Survive
DIY 2 Survive

 DIY 2 Survive A How To Guide Of Great Prepper Projects

Welcome to DIY 2 Survive A How To Guide Of Great Prepper Projects. I’ve collected some of my best DIY Projects in one easy place. Over the years since I started Survivalpunk I have done many DIY projects. Most of my best projects are a few years old now and are buried in the blog archives. Many of you might not ever see them.

With DIY 2 Survive A How To Guide Of Great Prepper Projects  I did the work of gathering them in one place. In this e-book you get 36 prepper projects.

This e-book is organized into 5 basic categories. Fire, Food, Gear,  Cleaning and Tech. Each section has several projects to choose from. I have detailed instructions to follow along with. There are over 150 photos in this packed e-book.


You will learn how to make a coffee can hobo stove with pot holders. The perfect lightweight stove to take backpacking. You don’t have to worry about bringing fuel with a hobo stove.  Learn how to make fuel tabs for esbit type stoves.

In the food section I teach you how to make your own camping meals. No more wasting money on Mountain House meals. Making them yourself and they will be much healthier than the junk on the market. I show you how to make fresh breakfast sausage at home. Finding sausage without fillers and chemicals is expensive. You get those 2 plus 10 more great recipes.

In the Gear section I show you how to make a velcro backed battery holder. These are really great to stick on packs and gear. They also are work amazing to keep batteries tidy in you pack. Have a great small light edc light and want to go hands free with it? I teach you how to make any small flashlight into a headlamp.


In the cleaning section I teach you how to save money and get rid of toxic cleaners. I have two chapters on making your own laundry soap. You will learn how to use baking soda and vinegar to clean around the house.

Lastly is the tech section. There are only two projects in here but they are big ones. First learn how to make a tough, waterproof, encrypted thumb drive to store your documents on. I may have over built this as it looks bomb proof. Finally building a backup battery bank. This is by far the most expensive and most important project in this book. I would not fault you for skipping to the end to do this one first.

To get a free copy of This ebook simply sign up for my mailing list. You will be sent to the download page. If you are already signed up you will not receive duplicates emails. I hope you enjoy.

Widget not in any sidebars

James and Mike A Day In THe Woods Autoimmune Diseases

Episode 35 DIY And Voting Rant

James and Mike DIY
James and Mike

First I want to apologize for this episode. I had trouble giving the quality you have come to expect. I am feeling a little under the weather but did not want to miss an episode. With that said you get to hear some excellent rants on voting and politics today. I go way off on a tangent and get angry. Which in turn fired up Mike. The main topic of the show is on DIY.

The News today was on The IRS over taxing legal marijuana shops. In some case over 100% tax rate. Mike picked another news story from cracked. We discuss 8 health foods that are bad for you. Mostly I get angry at the Author and bash her article.


Also Mentioned in todays show was a discount code for the Survival Punk Army. The Discount code will run until 11/12/2014. I’ll make a blog post later with more details.

Read More